Showing posts with label creative ideas. Show all posts

Sunday, January 8, 2012

Hubby's B-day Week

My husband celebrated a birthday last week and I gave him a little something each day of his birthday week until his birthday.  Inspired by this post on quick sweet treats from The Dating Divas, I picked out 4 small items I knew he liked and attached a card to each.  Because I used a couple of phrases that were different and for continuity's sake, I created my own cards to attach to each gift.  I also wrote a personal note for hubs on the back of each card.


I "soda" think you're great!  I left this in the fridge for hubs to find.

I'm "nuts" about you.  I used Goobers for this rather than a can of nuts.

You're my "lifesaver."

I love you to "pieces."

I love these cute and simple ways to say I love you!

Saturday, December 17, 2011

Christmas Crafting with Kids

I had great plans for crafting with my kids this holiday season.  Thanks to Pinterest, I found lots of great ideas that I really wanted to try out.  Fortunately, we have had the time to complete quite a few of the crafts on our plan.  Today I will be sharing pictures of some of the crafts we have completed, including links to the original projects where applicable.


These classic cinnamon-applesauce ornaments make your house smell delightful.  I used the recipe from McCormick.  These are easy and fun to make!

These precious Rudolph ornaments from Better Homes and Gardens were made using popsicle sticks painted brown, wiggly eyes and a red pompom.

This project is similar to one found on parents.com.  I traced a Christmas tree cookie cutter onto green felt then my daughter used tacky glue to attach beads to the ornament.

This project was inspired by a product found on this website.  I adapted it by using salt dough with green food coloring.  I created the hole in the top using a straw.  The discoloration in this picture is simply because the ornament is not completely dry.  Honestly, I have left them out for over a week now, rotating them every so often and they are still not completely dry.  I love the way they have turned out but really wish they would dry faster!

My daughter created these thumbprint Christmas tree cards for her teachers inspired by pictures from this site.

This is a classic hand and foot print Rudolph the Red-Nosed Reindeer craft.  My mom made one of these for us when my daughter was an infant so I created one for my son this year.  These will both hang in our front windows every Christmas.

I created footprint Christmas trees for both my son and daughter inspired by a picture I found here.

This handprint tree art is my personal favorite.  I absolutely love how this project turned out.  This will be our Christmas artwork above our mantle for quite some time now.

What projects have you completed with your child this holiday season?

Tuesday, November 22, 2011

Pinterest Advent Calendar--25 Days of Christmas


I love using Pinterest to bookmark great ideas that I want to try so I have a huge holiday pinboard.  I was worried that I wouldn't get to all of the great activities that I really wanted to do with my kids this holiday season so I wanted to have something at my fingertips to help.  I'm a planner and I love to have a list--I always get everything done when I have a list to work from so I took this idea and transformed it into a Pinterest list.  I created a seperate pinboard for my 25 Days of Christmas.  My kids and I will be doing one activity, craft project or baking project a day for 25 days.  I have printed this pinboard and put a copy on my refrigerator for easy reference.  I have also listed our 25 activities below.
Day 1--Make handprint Christmas tree painting.
Day 2--Create button wreath ornaments for our tree.
Day 3--Make Christmas tree jewel ornaments.
Day 4--Make cinnamon ornaments for our teachers and our tree.
Day 5--Create holiday jingle bell bracelets.
Day 6--Make Rudolph popsicle stick ornaments.
Day 7--Make footprint Christmas trees.
Day 8--Make thumbprint Christmas trees.
Day 9--Create simple salt dough family Christmas tree ornament.
Day 10--Make cookies to share with friends and neighbors.
Day 11--Make hot glue gun melted snowman ornament.
Day 12--Make snowman ornaments.
Day 13--Make painted handprint ornaments for both kids.
Day 14--Make hot chocolate on a stick to share with teachers and friends.
Day 15--Make salt dough handprint ornaments.
Day 16--Make pinecone Christmas tree table decoration.
Day 17--Make handprint Santa Claus ornaments.
Day 18--Make Rudolph Nutter Butter pops.
Day 19--Create popsicle stick Christmas tree.
Day 20--Make handprint wreath.
Dat 21--Create Santa handprint ornament.
Day 22-Make Christmas tree brownies.
Day 23--Make pompom ornament.
Day 24--Make button candy cane ornament.
Day 25--Make reindeer food for Rudolph and all the other reindeers.

I will be sharing some of the projects with you over the next few weeks.  What activities do you have on your pinboard?

Thursday, October 13, 2011

Salt Dough Pumpkins

This is a very simple, easy to make fall activity for kids.  My daughter had a great time making the dough and creating her pumpkins.


 For this activity you will need flour, salt, water and food coloring.

Combine 1 cup flour, 1 cup salt and 1/2 cup water to create your salt dough.

Seperate dough into two bowls, using a small amount for the stem and a larger amount for the pumpkins.  Add several drops of green food coloring to the stem dough.  Knead with hands until the dough is green.  Add yellow and red food coloring to larger dough ball and knead until you reach desired shade of orange.

Form pumpkins using orange dough and add a green stem.  Create lines along the sides of the pumpkin using a pencil.

Place pumpkins on a microwave safe plate and microwave in 30 second intervals until hard, approximately 1 1/2-2 minutes.

Allow pumpkins to cool before handling.

Thursday, October 6, 2011

Busy Bags, Part 1

I have seen some amazing ideas for busy bags lately that I can't wait to make for my daughter.  For those of you who have not heard of busy bags, you are missing out on a great idea.  A busy bag is simply an activity that your child can complete independently.  I use busy bags for my daughter while I'm cooking dinner, when we're out in public (i.e. waiting for our food at a restaurant or at the doctor's office) and when I need to keep her occupied for a short time.  Today I'm going to share with you some of the busy bags I have created for my daughter.  I store my busy bag activities in Ziplock bags but I'm looking for a more durable, inexpensive option for storing them.  Any ideas?

Paint Chip Memory
I created this memory game using leftover paint chips.

Stickers
My daughter created this book in Vacation Bible School but several sheets of paper stapled together would work just as well.  I included several sheets of stickers for her to choose from.

Reusable Sticker Board
These are reusable stickers on a plastic board.  This came from the school supply aisle at Dollar Tree several months ago but they are probably still available.

Cupcake Busy Bag
This cupcake busy bag activity was very easy to make and pretty inexpensive.  All you will need is a couple pieces of felt and scissors.

Popsicle Stick Puzzle
I love the idea of using family photographs for this popsicle stick puzzles.  My daughter absolutely loves trying to reassemble these easy to create puzzles.

Coloring
Easiest busy bag ever--crayons and a coloring book.  Just be sure not to leave this busy bag in the car or you will have a mess to clean up!

Paper Dolls
I made paper dolls for my daughter using this website.  She is a bit young for them right now but will grow into them.  I think making them magnetic and using them on a cookie sheet would be a great option to make these more user friendly for her.

Counting and Numbers Puzzle Pairs
I scored this number puzzle on clearance in the Target dollar spot.  I think I spent maybe $.50 on this.  Right now, my daughter is working on the puzzles with the pictures she can count.  I have not yet introduced her to the set with just the dot to count.

I am always seeking new ideas for busy bags.  I can't wait to try some of the ideas here.  Please feel free to share your links or ideas for busy bags.

Linking up at:

Wednesday, October 5, 2011

A Money-Saving Christmas: 8 Ways to Save on Wrapping Paper

Pretty wrapping paper for Christmas can be relatively expensive and will eat up quite a bit of your Christmas budget if you are not careful.  Here are several tips for saving money on this pricey necessity.

1. Purchase wrapping paper at after Christmas sales.  Wrapping paper is often marked down 75-90% off.  Beautiful, pricey paper can often be found for $1 or less.
2. Purchase wrapping paper at dollar stores.  Decent quality wrapping paper can often be found at the Dollar Tree.  Character wrapping paper for kids is often available.  Look at the square footage to find the best deal.
3.  Use paper bags that have been turned inside out or kraft paper to wrap presents.  Tie a 'ribbon' using twine or raffia and accessorize with things from nature (pinecones, pine needles, etc.).  You could also use stamps, leaf prints or sponge paint to create a design on the paper.
4. Use the Sunday comics.  Sunday comics are usually in color and make an excellent paper for wrapping.
5. Use empty food containers for wrapping.  Empty Pringles cans, Crystal Light containers or spaghetti jars can be covered with scrapbooking paper and used to hold small gifts.
6. Save gift bags.  Never purchase gift bags--simply hold on to the bags you receive for Christmas and remove any tags.
7. Use shredded colorful magazine ads for stuffing.  Instead of purchasing shredded paper to line a gift basket or place in the bottom of a gift bag, simply shred the sales ads from the paper and use this as your base.
8. Use old Christmas cards or paint chips as gift tags.  Simply cut out designs from the front of a Christmas cards or cut paint chips into a Christmas tree shape, then tie or tape to your gift.

What are your frugal ideas for wrapping paper?

Saturday, October 1, 2011

Snack Organization


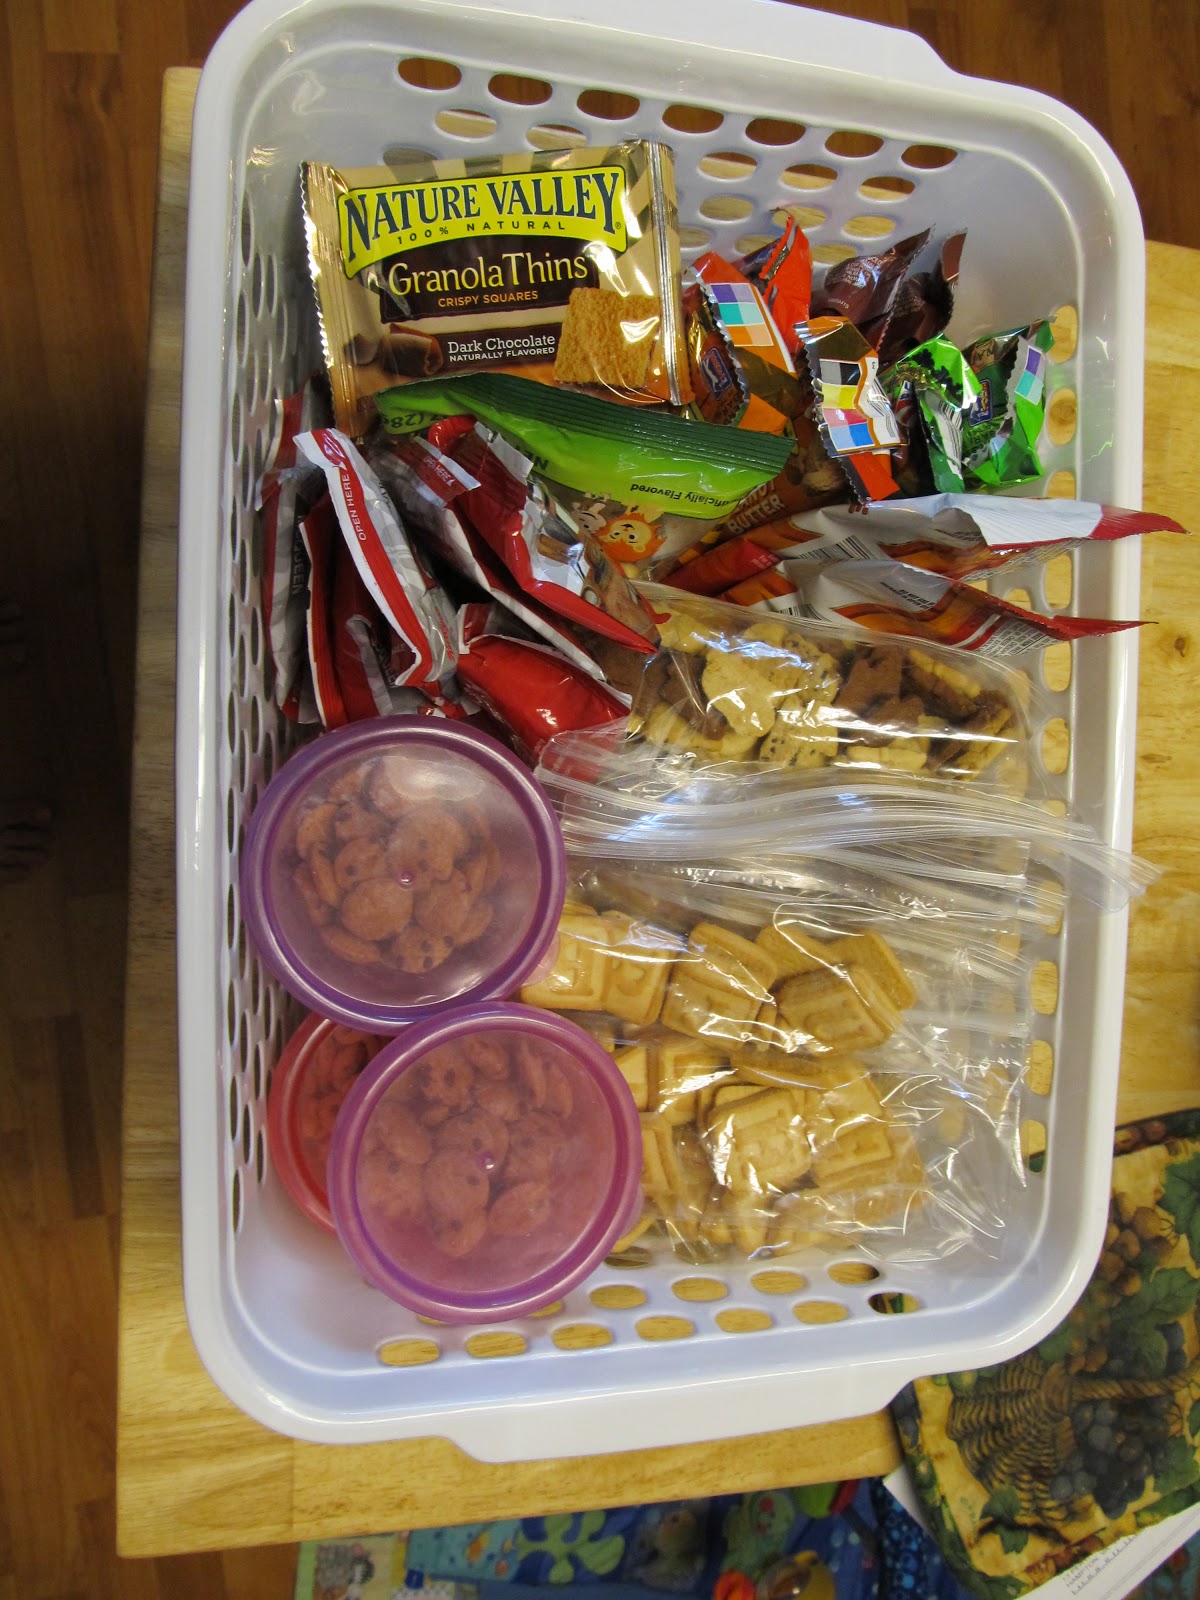
There are tons of ideas out in blogland recently for how to organize snacks and lunch items.  My daughter gets a morning snack and a snack after nap.  Most of the snacks I have for her are in a high cabinet she cannot reach so I decided to take some inspiration from the many ideas I've seen on blogs recently and create my own.  I simply took a plastic bin that we were not using and placed all of her snacks in it.  Pre-packaged snacks like fruit treats and granola bars are just stacked neatly.  I took Goldfish crackers, snack cookies and crackers and placed them in individual snack size baggies.  I also put small servings of cereal in plastic lidded cups that she can grab for a quick snack before she leaves on school days.  I put the basket in a low cabinet where she can easily reach it.  What a timesaver for me!

Friday, September 30, 2011

Pumpkin Patch Art


My daughter and I worked on this pumpkin patch artwork earlier this week.  Older children will certainly be able to make this look more like a pumpkin patch but I still think it's cute!  To create this artwork, simply have your child use his/her thumb to create pumpkins all over the paper.  Then create the vines using a pinkie finger dipped in green paint or a green marker.  We used green finger paint but, as you can see, our vines were very thick.  A thin green marker would probably work best.

Linking up at:

Wednesday, September 28, 2011

A Money-Saving Christmas: 5 Ways to Save on Cards


Christmas cards are a wonderful way to wish family and friends a happy holiday season but can be very expensive.  There are a few ways you can save some money on them.

1. Purchase photo cards through Shutterfly, Snapfish or Tiny Prints.  Near the holidays, you can frequently find coupon codes to get these cards for a very reasonable price.  Check websites such as Retail Me Not or blogs like Money Saving Mom for coupon codes that make these cards a steal.
2. Make your own.  If you are a scrapbooker or crafter, you probably have many of the supplies you would need to create beautiful handmade cards on hand.  Another idea is to create Christmas cards using your child's artwork.  Have your child create a footprint Rudolph or a thumbprint Christmas tree.  Copy and resize to use as the cover of your cards.
3. Purchase Christmas cards after Christmas.  You can often find boxes of Christmas cards at after Christmas sales for 75-90% off.  Box them up with the rest of your Christmas accessories and use them the following year.
4. For a non-traditional approach, send e-cards to friends and family.  123 Greetings and Hallmark offer a variety of e-cards free of charge.
5. Hand deliver your cards.  Stamps can be very expensive, especially if you are sending lots of Christmas cards.  For friends and family members that you see regularly, attach cards to Christmas presents or simply deliver during a visit.

What ideas do you have for saving on Christmas cards?

Sunday, September 25, 2011

Sticky Feet {Guest Post}

I am thrilled to have Vicky from Mess for Less guest posting today.  Vicky's blog shares wonderful ideas for hands-on, engaging activities for young children.  As a teacher, I truly believe that children learn best through process and the type of activities Vicky suggests are perfect for preschool-aged children.  Hop on over to Mess for Less and check out her incredible ideas!

Mess For Less

Hello readers of This Mom's Happy Life! I am so excited to be guest posting here! My name is Vicky and at my blog, Mess For Less, I share fun learning experiences I have had with my kids (3 year old twins and a 20 month old). I was a teacher before having my kids and taught a bunch of different grades: Pre-k, Kindergarten, First and Fourth. I love saving money, so most of my ideas and activities are budget friendly. Here is one of my cheaper and easier ideas.

Sticky Feet

I love contact paper. There, I've admitted it. When I was teaching I would buy roll upon roll of the stuff and cover all of the paperback books in my classroom. It made them so much sturdier and the covers were so easy to clean. As a mom, I still love contact paper. I have used it in the past for art activities. You can find it at the dollar store which makes me love it even more!

Today, I am using it to provide a sensory experience for little ones. So if you are reading this and not the least bit crafty, fear not! This requires absolutely no skill and minimal effort, yet it will entertain the kids for a long time. You will need clear contact paper and masking tape. I unrolled some contact paper (maybe 2 feet long, but you can experiment with lengths) peeled off the backing and placed it on the floor with masking tape. Then I let my kids run amok. That's all there is to it! I will say that peeling the backing off the contact paper is the most challenging part for me. Maybe some of you are more dexterous. I usually end up with the contact paper stuck on me and folded over on itself.

Here you can see how I stuck it on the floor.


My kids loved running through the contact paper and hearing the noises as their feet stuck and unstuck. But that was not all. Soon, the twins had set up a picnic on the sticky feet mat. They liked how they could place their plates and toy bottles on the contact paper and have them stick. If you'll notice, one of the girls is using the backing I peeled off the contact paper as a picnic blanket. I was going to throw it out (bad mama!) and she rescued it.


Well, it wasn't long before little sister joined the party. Party crasher!


What I love about this simple activity is that it went in a direction I could have never predicted. I had simply intended for the kids to have a fun tactile experience, and they ended up using the contact paper for imaginative play as well. So you never know where something seemingly simple might lead.

 
Exhausted after playing, they pretend to nap on the contact paper.


For many more ideas and activities please come visit Mess For Less. Hope to see you there!


Thursday, September 22, 2011

Paint Chip Memory

I've seen tons of ideas in blogland for craft projects using paint chips.  I can't wait to try this word family game using leftover paint chips from previous painting projects.  This game would be great to use in my classroom (and with my daughter as she gets older).  I created this game yesterday because my daughter LOVES memory games and has learned all of her colors.  This is so simple--and I'm sure it's been done before--but I have not seen a paint chip memory game yet.  Here are the easy instructions:

For this game you will need two sets of each color paint chip and cardstock.

Choose several shades from each paint sample and glue to cardstock.  I used spray craft glue but any type of glue will work.  Be sure to cover the entire surface with glue--when you cut it will fall apart if you have not glued all parts.  At this point you could choose to laminate for durability.

 Cut apart each individual paint chip.  I have 42 cards here but I will not be using them all for my daughter.  For young children (3-4 years old) I would recommend no more than 20-25 cards.

To play the game, simply turn over 2 cards at a time.  If they match, the player keeps the cards and gets another turn.  If they do not match, flip them back over and the next player gets a turn.  Continue until all cards have been matched.  For young children, you can place them face up and simply have them match colors and name the colors.

I'm sure you all have other wonderful ideas for what to do with this activity.  What are your suggestions?

Linking up at:

  Somewhat Simple    HookingupwithHoH